Profitbase InVision Access Control is a module that provides a workbook for managing user mapping to roles with access to solution items and data items.
1 Functions, limitations and recommendations
The concept for access control in Profitbase Invision are based on roles: Roles can be solution or data roles with access to solution items and data items respectively. By associating users with one or more roles the user will get access to the solution and data items that the role(s) got access to.
Access Control module covers the following functions related to manage user access for InVision Solutions:
- Add and remove users
- Add and remove user access to roles
What is not covered by this solution and hence needs to be managed using the built-in functions in Profitbase InVision Designer:
- Create new and remove roles
- Add and remove role access to solution items such as workbooks
- Add and remove role access to data items such as an organization hierarchy
Each installation needs to be set up with solution roles and data roles such that:
- Solutions roles exists with access to Workbooks
- Data roles exists with access to data items
It is strongly recommended to separate roles in solution roles and data roles because these are independent. The only exception to this is typical administrator groups that will have access to “everything”.
This way there will be a conscious granularity for the solution items and data items that is required when setting access. It is recommended to create a solution role for each Workbook and a role for a sufficient set of data items – items in an organizational hierarchy. This solution is anticipating elements from one hierarchy.
2 Using Access Control
Here is a few typical tasks involved with managing user access.
The picture below shows the main screen for managing access. The left is a filter to select users. Selected Users will appear under the Show Users. Likewise, there is a filter for selecting roles where selected roles will be listed in Show Roles.
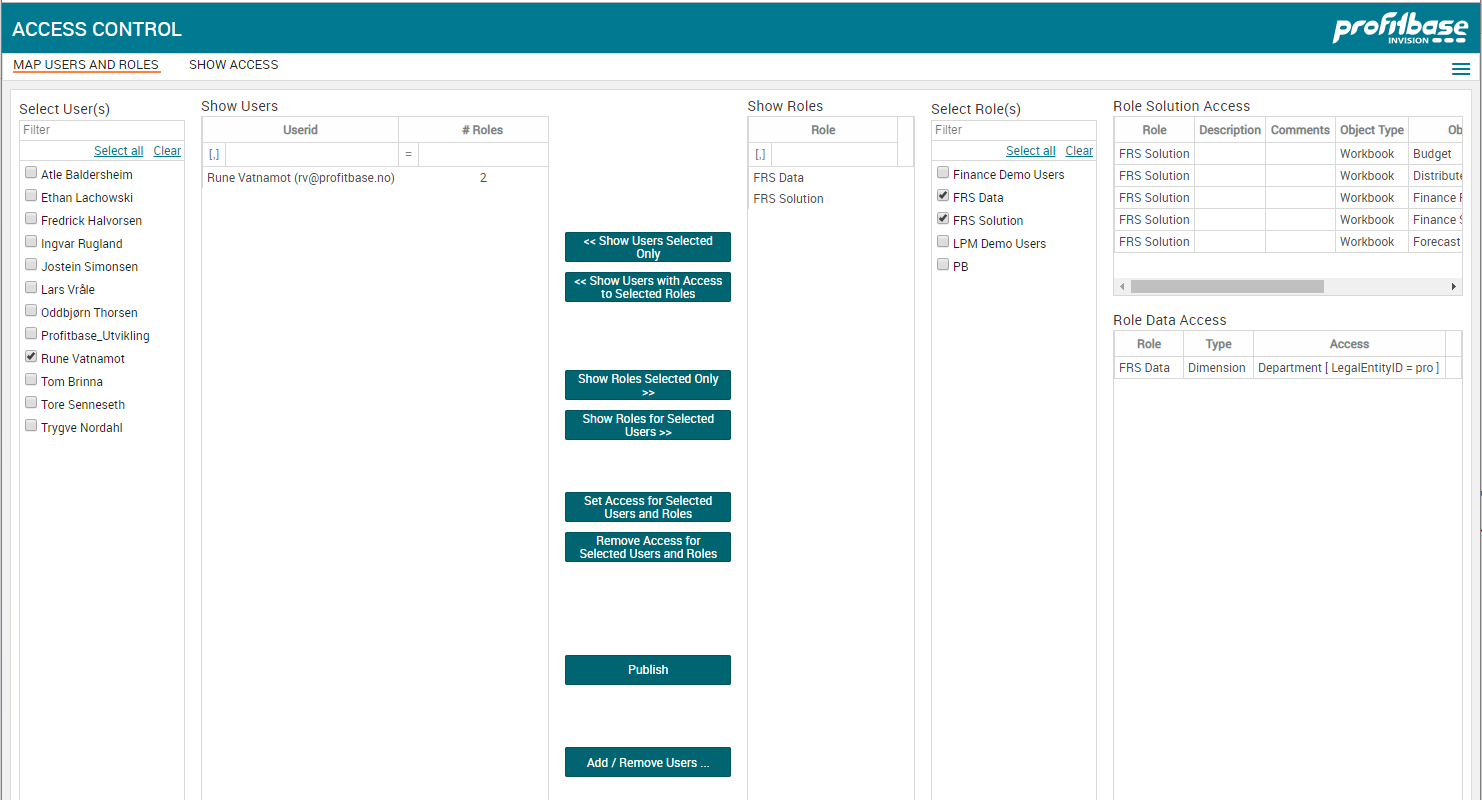
When selecting roles with users selected a role count will be updated to show the number of roles that the use has access to of the selected roles.
To the far right you can see the details on which access is set for the selected roles.
In the middle there is a column with buttons:
Show Users Selected Only – this will ensure that only selected users will be present in “Show Users” table
Show Users with Access to Selected Roles – this will show the users that have access to the roles selected. This button and the button above will toggle the content in Show Users between selected users only and users with access to selected roles.
The next pair of buttons toggles which roles are shown in Show Roles.
Show Roles Selected Only – shows only the roles selected in the tick-box filter.
Show roles for Selected Users – shows the roles that the selected users have access to.
Set Access for Selected Users and Roles – this will create the mapping between selected users and selected roles. This mapping is what will provide the selected users access to the solution and data items that the selected roles got access to.
Remove Access for Selected Users and Roles – this will remove the mapping between selected users and selected roles.
Note: Access is changed only for users and roles that are selected by “ticking” the users and roles in their respective filters. This is not necessarily the same set shown in “Show Users” and “Show Roles”.
Publish – this will deploy all access changes done in Access Control.
Note: Access changes will not have any effect until Publish is completed.
Add / Remove Users – this is the place to add new users and remove users. When removing users, the role mapping will also be removed.
Below is a description of some central workflows to users access management.
Add a new user:
- Click Add / Remove Users to bring up the popup where you can add users
- Right-click and select “Insert row” and fill in as shown below
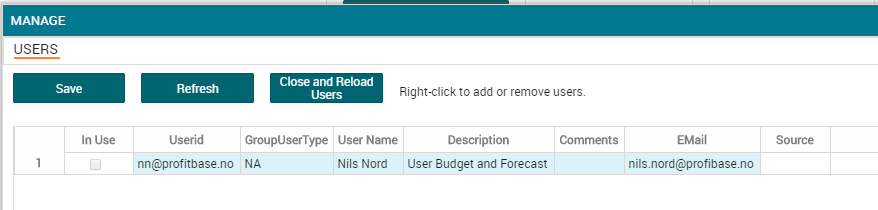
- Save any changes (also when deleting users)
- Close and Reload Users for new users to appear in the filter to the left.
Note: The content in UserID column is critical be get correct and depend on which solution is used for authenticating users: Azure Active Directory or Active Directory (AD). In case of AD the UserID must be the SID (looks like: S-1-5-21-839522115-920026266-725395543-3303). If it is Azure AD it is likely to be the UPN (Unique Principal Name) which often is equal to the email address. This is however configurable for each installation. Getting this wrong will cause users to not get access.
Set (and remove) access:
- Select the user(s) to get access
- Select the role(s)
- Push “Set Access for Selected Users and Roles”. This will present a confirmation popup for you to inspect the settings before confirming or canceling the operation. The table will also show is the role is providing access to data and/or solution items. You will also be able to see if the user(s) already got access through the role.
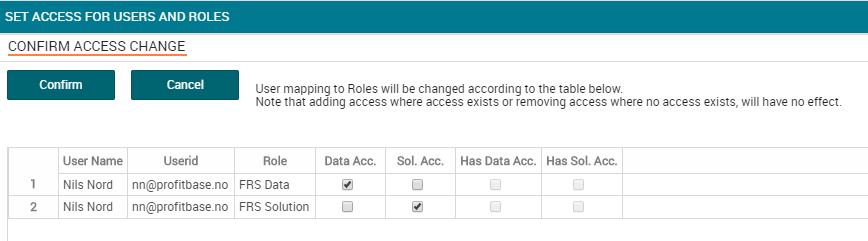
- Push “Confirm” for the access changes to be saved to Access Control. Use Cancel or the X to close the popup.
- Publish the access changes to the system for changes to be effective. During publishing, notifications on progress will be posted to your screen and buttons will be disabled during the process.
Removing access is performed the same way except that you use the button: “Remove Access for Selected Users and Roles”.
Note: Setting access to users that already have access will not do any harm but will be ignored. Likewise removing access for non-existing access will have no effect.
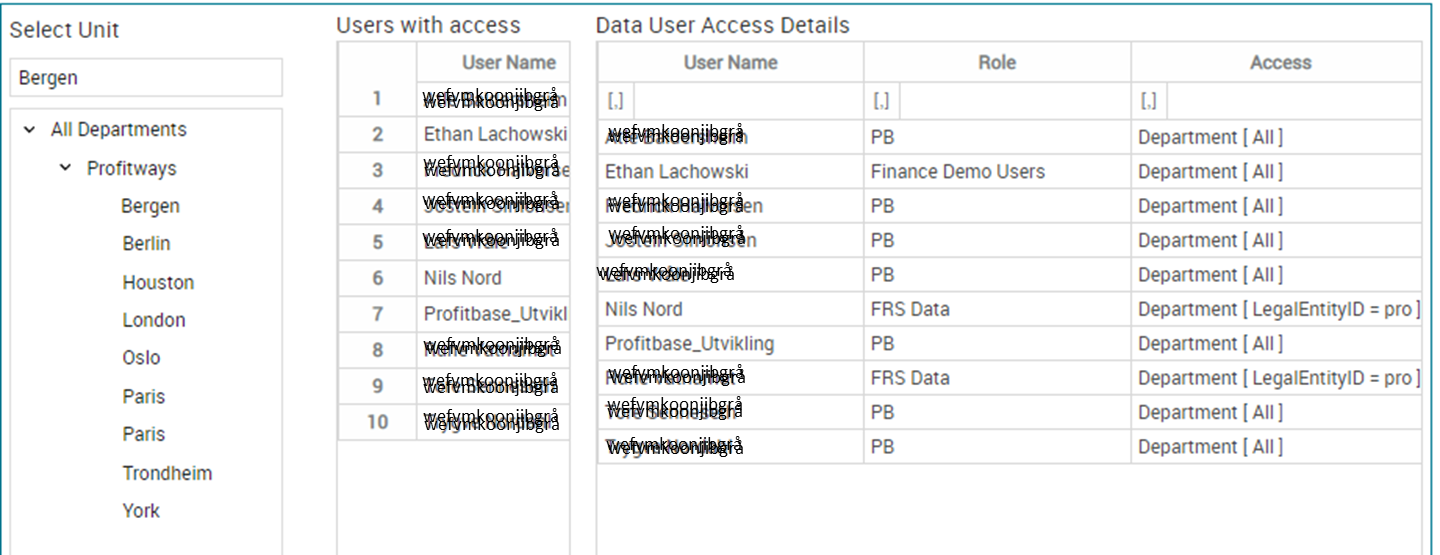
The page titled “Show Access” will help you to investigate which users has access to selected solution and data items. For example, selecting the Finance Reports workbook will show the users and which roles have access (see picture below).

Similar for data items when selecting the department “Bergen”, the Users, roles and accesss rule will show.
Access Control should be helpful managing user access. Please contact Profitbase if you need more help.
Remember that if you find that there are solution items or data items missing due to lack of roles, these are easily added using the designer. Profitbase should be consulted to ensure that such changes does not conflict with existing set of roles being used.